Building Instagram Reels with NextJS 13, Pocketbase and Tailwind CSS
In this tutorial, I share highlights on how to build a simple Instagram/TikTok similar app with Next.js and Pocketbase. The app features SSR, Authentication, Infinite loading with SWR, App directory architecture and Tailwind CSS superfast styling ⚡.
In this tutorial, I share highlights on how to build a simple Instagram/TikTok similar app with Next.js and Pocketbase. The app features SSR, Authentication, Infinite loading with SWR, App directory architecture and Tailwind CSS superfast styling ⚡.
The link to the full code is also available for you for free using the link below.
Starting the Project
Installing Pocketbase
Pocketbase is a full backend running on a single executable file with SQLite, to install Pocketbase simply download and extract the .exe file to your project directory.
Creating Next.js app
Creating our Next.js app is as simple as running the following command.
npx create-next-app@latest --experimental-appInstalling the project dependencies
Next step is to install the project dependencies.
{
  "name": "insta-reels",
  "version": "0.1.0",
  "private": true,
  "scripts": {
    "dev": "next dev",
    "build": "next build",
    "start": "next start",
    "lint": "next lint"
  },
  "dependencies": {
    "@next/font": "13.1.1",
    "@radix-ui/react-dropdown-menu": "^2.0.2",
    "@radix-ui/react-icons": "^1.1.1",
    "@types/node": "18.11.18",
    "@types/react": "18.0.26",
    "@types/react-dom": "18.0.10",
    "cors": "^2.8.5",
    "eslint": "8.31.0",
    "eslint-config-next": "13.1.1",
    "next": "13.1.1",
    "nextjs-cors": "^2.1.2",
    "pocketbase": "^0.9.1",
    "react": "18.2.0",
    "react-dom": "18.2.0",
    "react-infinite-scroll-component": "^6.1.0",
    "react-intersection-observer": "^9.4.1",
    "react-timeago": "^7.1.0",
    "swr": "^2.0.3",
    "typescript": "4.9.4"
  },
  "devDependencies": {
    "@types/cors": "^2.8.13",
    "@types/react-timeago": "^4.1.3",
    "autoprefixer": "^10.4.13",
    "postcss": "^8.4.21",
    "tailwindcss": "^3.2.6"
  }
}
Setting up Tailwind CSS
Adding Tailwind CSS requires few additional steps highlighted in this simple guide.
Below is the tailwind config file that works with Next.js app directory.
/** @type {import('tailwindcss').Config} */
module.exports = {
  content: [
    "./app/**/*.{js,ts,jsx,tsx}",
    "./pages/**/*.{js,ts,jsx,tsx}",
    "./components/**/*.{js,ts,jsx,tsx}",

    // Or if using `src` directory:
    "./src/**/*.{js,ts,jsx,tsx}",
  ],
  theme: {
    extend: {},
  },
  plugins: [],
}
Next is to import Tailwind in your globals.css
@tailwind base;
@tailwind components;
@tailwind utilities;
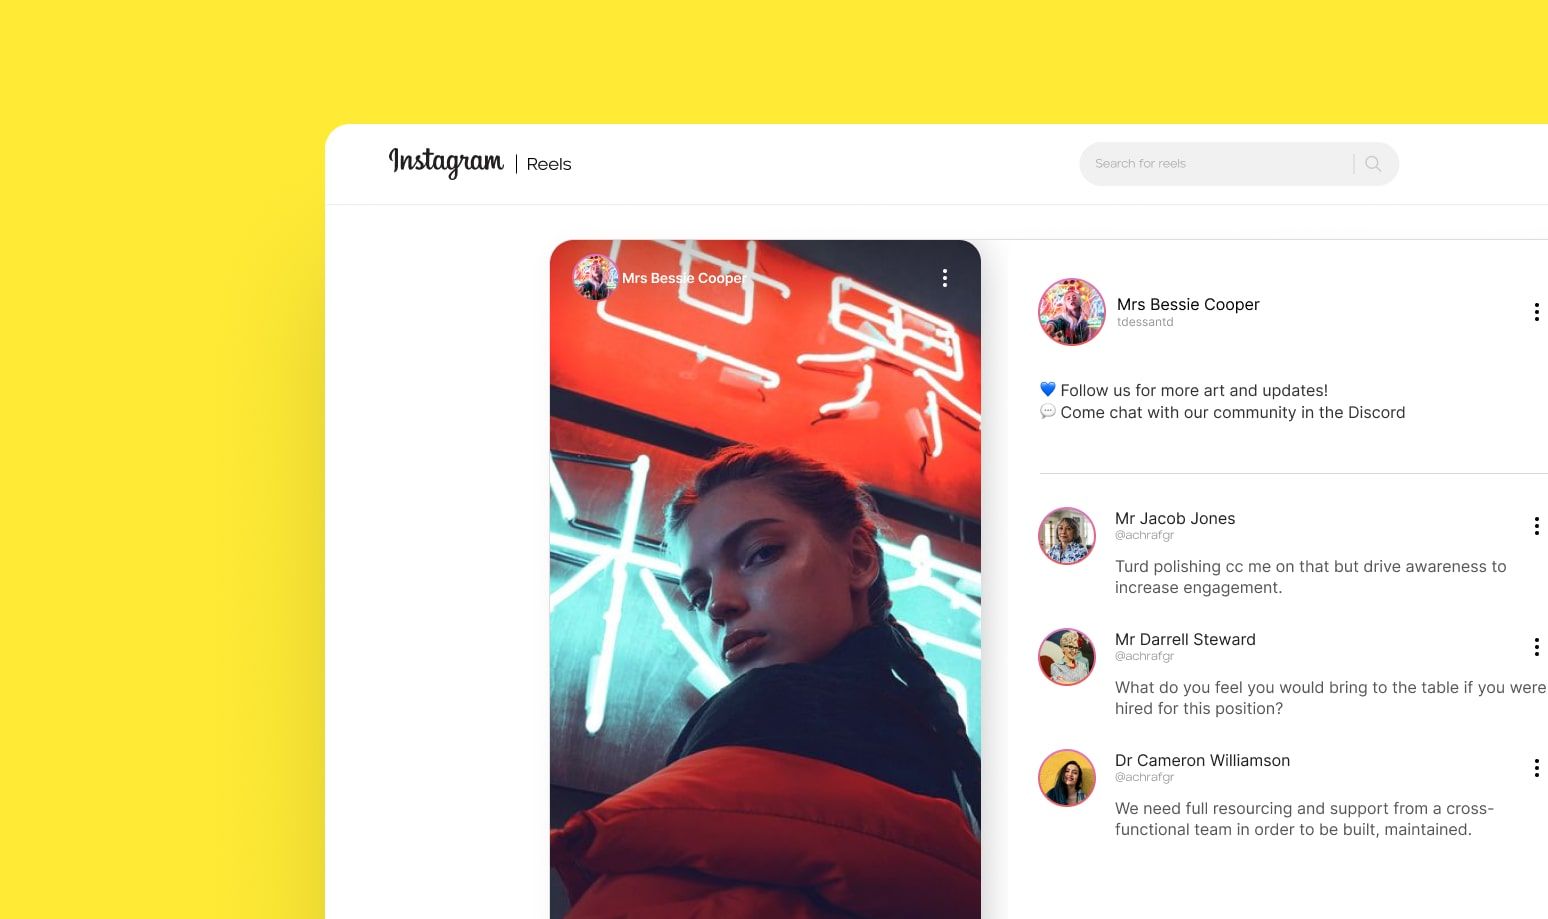
Breaking down the app design
In order to understand the project's structure, studying the at the design on Figma is the first logical step,
the app has the following components
- Navigation bar appearing in all pages except login and Signup
- The video player displaying the reels.
- Comments, Likes related to a specific post
- Notification list displaying likes for all post related to the current user.
- Authentication forms
- Video upload form
- Comment form
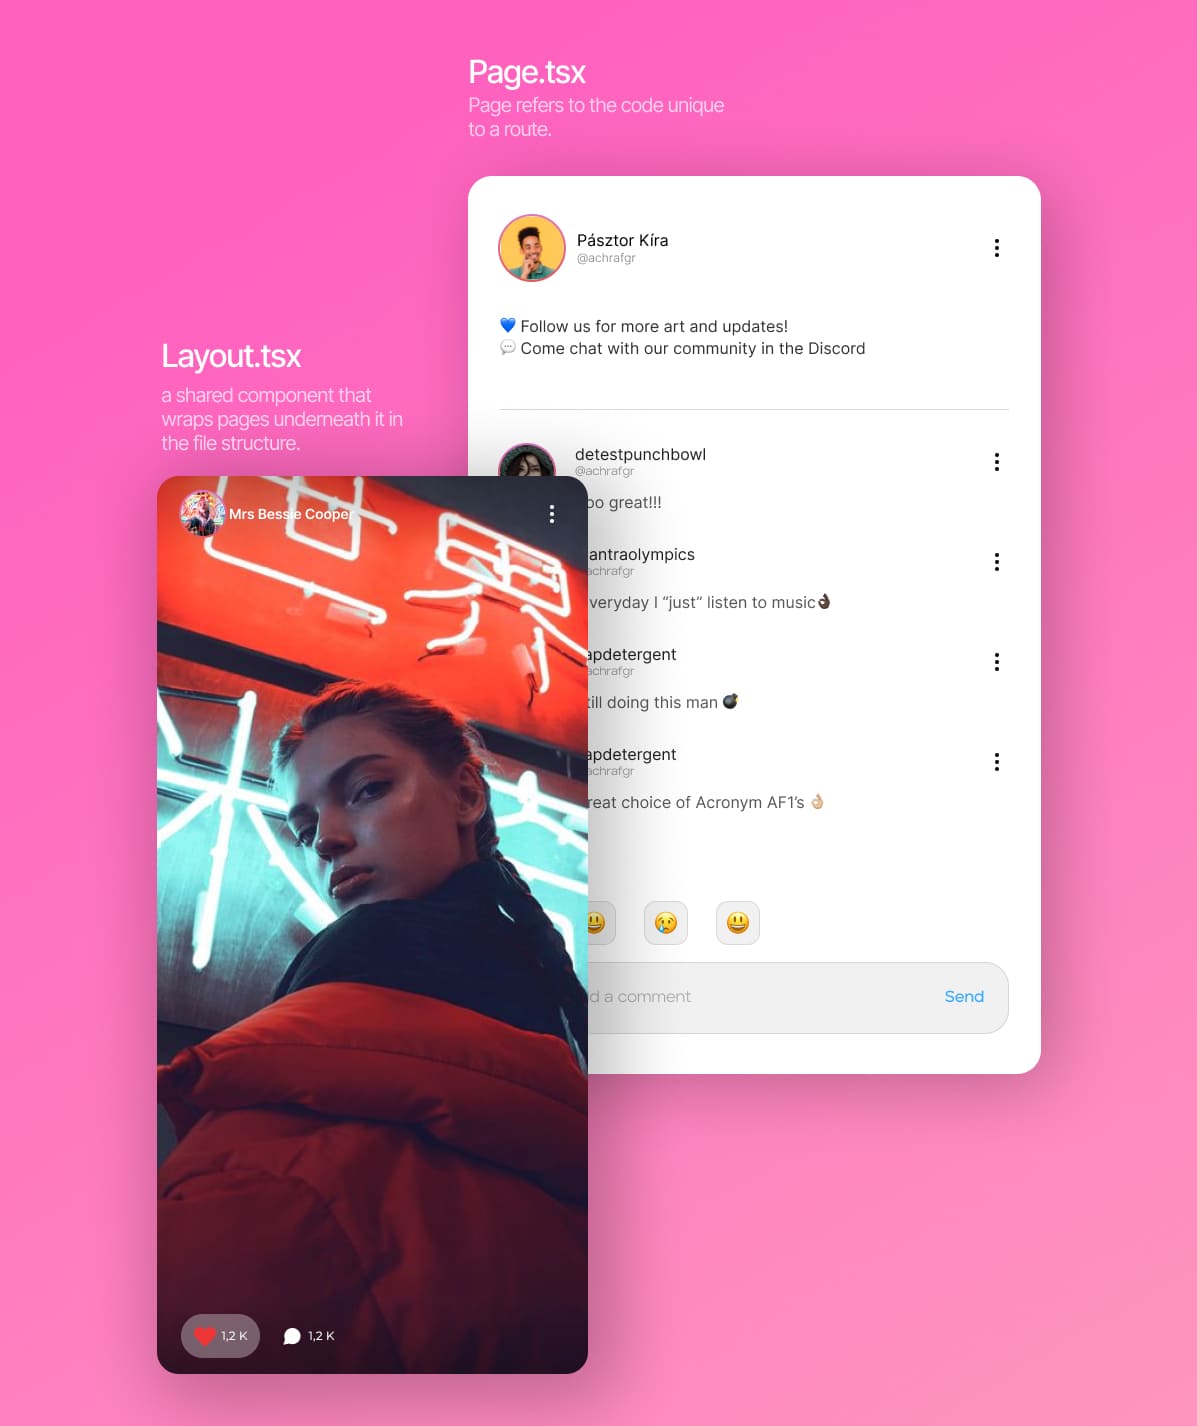

Understanding the app directory
App directory is a new concept in Next.js. It helps is easily share layout across pages following a specific file structure.
- Layouts refer to a shared component that wraps pages underneath it in the file structure.
- Folders refer to a single or a dynamic route.
- Page refers to the code unique to a route.
In this app I made use of the top level layout by adding a nav-bar component in my top level layout, this adds the nav-bar to all the routes in the app without any additional configuration.
Additionally, I knew that both [post]/likes and [post]/comments will share a video component, So I added the video component in the layout.tsx inside the [post] route.
Authentication
Adding the schema to pocketbase
Pocketbase has a useful feature allowing us to add a schema from a JSON file, so that you don't have to rebuild the backend to using the UI, To add the pocketbase schema for this app, simply navigate to the repo folder/pocketbase and add the schema to pocketbase.
Initializing Pocketbase client
Because pocketbase client is used a lot in the project, I stated by initializing it and exporting the client instance in a function.
import PocketBase from 'pocketbase'

export const pb = new PocketBase(process.env.NEXT_PUBLIC_POCKETBASE)
Login and Sign-Up forms
Using the same process, I created a login and create-account folders with in which I added a page.tsx containing some simple styling and branding, followed by a Login Form component as a client component.
This makes all the following code is running on the server except for the login form components which needs state and user interactivity, making it necessary to be rendered on the client
import LoginForm from 'components/auth/LoginForm'
import Image from 'next/image'
import Link from 'next/link'
function Login() {
  return (
    <div className="flex flex-col items-center">
      <div className="flex items-center gap-2 mb-8">
        <Image src={'/Logo.svg'} width={115} height={32} alt={'logo'} />
        <Image src={'/sub_logo.svg'} width={55} height={19} alt={'logo'} />
      </div>
      <div>
        <h1 className="text-center font-semibold text-gray-700 mb-6">
          Login to your account
        </h1>
      </div>
      <LoginForm />
      <div className=" my-8">
        New user ?
        <span>
          <Link
            className=" font-semibold text-sky-500 mx-2"
            href={'/account/create-account'}
          >
            Sign up
          </Link>
        </span>
      </div>
    </div>
  )
}

export default Login
The login form itself is a simple react form, on form submit, we use pocketbase client's authwithpassword function to authenticate the user, the client automatically stores the auth token in the browser's local storage to be used in following requests.
(Note that the full code for the login form is available in the GitHub repo below)
  const handleLogin = async (event: any) => {
    event.preventDefault()
    setLoading(true)
    try {
      const result = await pb
        .collection('users')
        .authWithPassword(email, password)
      await login(email, password)
      setStatus('Logged in successfully ✅')
      router.refresh()
      router.replace('/')
    } catch (e) {
      console.log(e)
      setStatus('Unable to Login 🚫')
    }
    setLoading(false)
  }
Layout
To add the navbar to all pages, I simply added the navbar component to the root layout
Navbar component
The navbar components checks if the user is logged in to render the avatar and navigation items for logged-in users, if no logged-in user is found the component simply renders a login button.
import { useUser } from 'utils/useUser'
import Link from 'next/link'
import Image from 'next/image'
import { Avatar, ButtonLink, CreatePostButton, SearchBar } from 'components/UI'
import { MobileNav, NavbarDropDown } from 'components/layout'
import { getUSerData } from 'utils/useUser'

async function Navbar() {
  const user = useUser()
  const userData = await getUSerData()

  return (
    <>
      <nav className="py-3 px-16 border-b border-zinc-200 hidden w-full sm:fixed sm:top-0 sm:z-20 bg-white sm:flex sm:flex-row sm:items-center ">
        <Link href={'/'} className="flex items-center gap-3 flex-grow   ">
          <Image src={'/Logo.svg'} width={115} height={32} alt={'logo'} />
          <Image src={'/sub_logo.svg'} width={55} height={19} alt={'logo'} />
        </Link>

        <div className="flex flex-grow items-center flex-row justify-center">
          <SearchBar />
        </div>
        <div className="flex flex-row items-center justify-end gap-4 flex-grow">
          {user ? (
            <>
              <CreatePostButton />
              <Avatar user={userData} />
              <NavbarDropDown />
            </>
          ) : (
            <ButtonLink href={'/account/login'}>Login</ButtonLink>
          )}
        </div>
      </nav>
      <MobileNav />
    </>
  )
}

export default Navbar
Post page layout
Because we know that the post pages use a common component for all pages which is the video, I added that on layout.tsx
The following code fetches the post from the backend and renders the video, note that the layout renders children which is where subpages will be rendered.
import React from 'react'
import PostCard from 'components/post/PostCard'
import { api_Url } from 'utils/consts'
type PageProps = {
  params: {
    id: string
  }
  children?: React.ReactNode
}

async function layout({ params, children }: PageProps) {
  const { id } = params

  const post = await fetch(
    `${api_Url}collections/posts/records/${id}?expand=profile`,
  ).then((res) => res.json())

  return (
    <div className="grid grid-cols-1 grid-flow-row rounded-3xl border border-zinc-200 sm:grid-cols-2 mt-4 ">
      <div className=" overflow-hidden rounded-3xl max-h-screen h-[820px]">
        <PostCard post={post} />
      </div>
      <div className="flex-grow pt-8 p-4 sm:p-8 s:pt-0">{children}</div>
    </div>
  )
}

export default layout
/Post/[id]/
Comments and Likes with SWR and infinite loading
The design shows the list of likes and comments to the side of the video, to achieve that we could either render the list on the server or on the client, I choose to fetch and render the data using SWR on the client to make use of SWR's infinite load query, allowing the app to infinitely fetch more comments as the user scrolls.
function InfiniteLikes({ postId }: { postId: string }) {
  const { data, error, mutate, size, setSize, isValidating } = useSWRInfinite(
    (index) =>
      `${api_Url}collections/likes/records?filter=post="${postId}"&page=${
        index + 1
      }&perPage=${pageSize}&sort=-created&expand=profile`,
    fetcher,
  )
  // ... handle loading and error states
  if (error) return <Error message="An error has occurred." />
  if (!data) return <Loading />

  // ... handle loading empty response
  if (data[0].totalItems === 0) return <p>No likes...</p>

  // ... Calculate totla items
  let totalPages = 0
  for (let i = 0; i < data.length; i++) {
    totalPages += data[i].items.length
  }

  const likes = data ? [].concat(...data) : []

  const isReachingEnd =
    data.length * pageSize < data[data.length - 1].totalItems

  // ... Mutating pages on deleting a comment
  const handleDelte = async () => {
    await mutate()
    if (size > totalPages / pageSize && size > 1) {
      setSize(size - 1)
    }
  }

  const loadMore = () => {
    setSize(size + 1)
  }

  return (
    <div>
      <InfiniteScroll
        dataLength={data.length} //This is important field to render the next data
        next={loadMore}
        hasMore={isReachingEnd}
        loader={<h4>Loading...</h4>}
        endMessage={<ScrollEnd />}
      >
        {likes.map((page: any) => {
          return <InfiniteLikesPage key={page.items[0].id} data={page.items} />
        })}
      </InfiniteScroll>
    </div>
  )
}

export default InfiniteLikes
Infinite loading with SWR
While mapping the list of likes, we render a Like card component
import { Like } from 'types'
import { Date, Avatar, ButtonLink } from 'components/UI'

function LikeCard({ data }: { data: Like }) {
  return (
    <div className="flex gap-2 items-center mb-5">
      <Avatar user={data.expand.profile} size={56} />
      <div className="flex-grow">
        <p className="text-sm font-semibold">{data.expand.profile.name}</p>
        <p className="text-sm text-zinc-400">{data.expand.profile.username}</p>
      </div>
      <Date date={data.created} />
    </div>
  )
}

export default LikeCard
Using the same principle to render the comments, and finally add a Create Comment component to create a comment using simple react forms.
Note that I used SWR's mutate function with tells SWR to re-fetch the comment list with the new comment.
      setLoading(true)
      formData.append('content', comment)
      try {
        await pb.collection('comments').create(formData)
        setStatus('Comment added successfully ✅')
      } catch (e) {
        console.log(e)
        setStatus('Failed tp update 🚫 ')
      }
      // Disable loading
      setLoading(false)
      // Refrech Page to display new comment
      await mutate(
        `${api_Url}collections/comments/records?filter=(post='${postId}')`,
        true,
      )
      await onMutate()
      // Clear input
      setComment('') // mutate
    }
Create comment function
Post card
The post card component takes the post data from the layout and renders three subcomponents with are the PostHeader, Player and PostFooter.
function PostCard({ post }: { post: Post }) {
  const router = useRouter()
  const model = pb.authStore.model
  const videoUrl = `${api_Url}files/posts/${post.id}/${post.fileUrl}`

  const handleDelete = async () => {
    try {
      await pb.collection('posts').delete(post.id)
      await router.replace(`/profile/${model?.username}`)
    } catch (e) {
      console.log(e)
    }
  }

  return (
    <div className="h-full flex flex-col justify-center overflow-hidden shadow-2xl relative mx-[-16px] sm:mx-0 sm:rounded-3xl sm:max-h-[720px]">
      <PostHeader user={post.expand.profile} />
      <Player videoUrl={videoUrl} />
      <PostFooter id={model?.id || ''} post={post} />
    </div>

  )
}

export default PostCard
Post Header
The post header simply returns the avatar and name of the user displayed relative to the post container.
function PostHeader({ user }: { user: User }) {
  return (
    <div className=" z-10 drop-shadow-sm absolute top-0 text-white p-6 flex gap-2 items-center w-full bg-gradient-to-b from-custom-shadow">
      <div className="flex gap-2 items-center flex-grow">
        <Avatar user={user} size={40} />
        {user.name}
      </div>
    </div>
  )
}

export default PostHeader
Post Header
Post Footer
Similar to the post header, the post footer fetches the likes and comments count, then returns the comment count, the likes count as well a Like button component
  const likes = useSWR(
    `${api_Url}collections/likes/records?filter=(post='${post.id}')`,
    fetcher,
  ) as { data: LikeList }

  const comments = useSWR(
    `${api_Url}collections/comments/records?filter=(post='${post.id}')`,
    fetcher,
  ) as { data: CommentList }
function PostFooter({ post, id }: IPostFooter) {
const liked = isLiked.data.totalItems > 0 ? true : false
return (
<div className="absolute bottom-0 w-full p-6 pb-12 text-white bg-gradient-to-t from-custom-shadow sm:pb-6 ">
<Link href={`/posts/${post.id}`}>
<p className="py-4">{post.caption}</p>
</Link>
<div className="flex gap-4 items-center">
<LikeButton
totalLikes={likes.data.totalItems}
liked={liked}
postId={post.id}
id={id}
/>
<Link href={`/posts/${post.id}/comments`}>
<p>{comments.data.totalItems} Comments</p>
</Link>
</div>
</div>
)
}
export default PostFooterPost Footer
Player
Instagram Reels is more that rendering a video, the special about the Player components is that we needed to render the video and play it when it appears on the screens, and pause it as soon as it exits the viewport. This was done using the React intersection observer library.
function Player({ videoUrl }: { videoUrl: string }) {
  const [isVisible, setIsVIsible] = useState(false)
  const [playing, setPlaying] = useState(false)

  const vidRef = useRef() as RefObject<HTMLVideoElement>

  const togglePlay = (visible: boolean) => {
    if (visible) {
      setPlaying(true)
      if (vidRef.current) {
        vidRef.current.play().catch((e) => {
          console.log(e)
        })
        vidRef.current.muted = false
      }
    } else {
      setPlaying(false)
      if (vidRef.current) {
        vidRef.current.pause()
        vidRef.current.muted = true
      }
    }
  }

  return (
    <>
      <InView
        className="h-full"
        onChange={(inView) => {
          setIsVIsible(inView)
          togglePlay(inView)
          //   setPlaying(inView)
        }}
      >
        <div className="flex flex-col justify-center h-full">
          <video
            ref={vidRef}
            src={videoUrl}
            loop={true}
            autoPlay
            muted
            className="min-h-full object-cover"
          />

          <button
            onClick={() => togglePlay(!playing)}
            className="absolute z-20 right-7 bottom-16 text-white sm:bottom-8"
          >
            {playing ? (
              <PauseIcon width={24} height={24} />
            ) : (
              <PlayIcon width={24} height={24} />
            )}
          </button>
        </div>
      </InView>
    </>
  )
}

export default Player
Player
Fetching posts with Infinite Loading
Similarly to comment and likes, I used the infinite query function from SWR to load the post paired with intersection observer to track when the user is near the end of the post list to trigger a new fetch and render more posts.
function InfinitePosts({ userId, searchQuery }: Props) {
  let searchParam = ''
  if (searchQuery) {
    searchParam = `&filter=(caption~'${searchQuery}')`
  }
  let filerParam = ''
  if (userId) {
    filerParam = `&filter=(profile='${userId}')`
  }
  const [hasNextPage, setHasNextPage] = useState<boolean>(true)

  const { data, error, mutate, size, setSize, isValidating } = useSWRInfinite(
    (index) =>
      `${api_Url}collections/posts/records?page=${
        index + 1
      }&perPage=${pageSize}&sort=-created${filerParam}${searchParam}&expand=profile`,
    fetcher,
  )
  // ... handle loading and error states
  if (error) return <Error message="An error has occurred." />
  if (!data) return <PostSkeleton />

  // ... handle loading empty response
  if (data[0].totalItems === 0) return <Error message="No posts found..." />

  // ... Calculate totla items
  let totalPages = 0
  for (let i = 0; i < data.length; i++) {
    totalPages += data[i].items.length
  }

  const posts = data ? [].concat(...data) : []

  const isReachingEnd =
    data.length * pageSize < data[data.length - 1].totalItems

  // ... Mutating pages on deleting a comment
  const handleDelte = async () => {
    await mutate()
    if (size > totalPages / pageSize && size > 1) {
      setSize(size - 1)
    }
  }

  const handleLoadMore = () => {
    if (totalPages < data[0].totalPages) {
      setSize(size + 1)
      setHasNextPage(true)
    } else {
      setHasNextPage(false)
    }
  }

  return (
    <>
      {data && (
        <>
          <>
            {posts.map((page: PostList) => {
              return (
                <InfinitePostsPage
                  key={page.items[0].id}
                  data={page.items}
                  onMutate={handleDelte}
                />
              )
            })}
          </>
          {hasNextPage && (
            <InView
              onChange={(inView) => {
                if (inView) {
                  handleLoadMore()
                }
              }}
            >
              <Loading />
            </InView>
          )}
          {!hasNextPage && (
            <div className="h-screen snap-start flex flex-col items-center justify-center rounded-3xl mx-auto my-4">
              <ScrollEnd />
            </div>
          )}
        </>
      )}
    </>
  )
}

export default InfinitePosts
Create Post
The create post route renders a simple form to add a post.
  const submitForm = async (event: any) => {
    event.preventDefault()
    setLoading(true)

    const formData = new FormData()

    formData.append('profile', id)

    if (file) {
      formData.append('fileUrl', file)
    }
    if (caption) {
      formData.append('caption', caption)
    }
    try {
      const { id } = await pb.collection('posts').create(formData)
      setStatus('Updated successfully ✅')
      router.refresh()
      router.push(`/posts/${id}`)
      setLoading(false)
    } catch (e) {
      console.log(e)
      setStatus('Failed tp update 🚫 ')
      setLoading(false)
    }
  }
Search
The search from in the navbar is a form with a text input that sends users to /search route with a query parameter, for example '/search?q=postname'
function SearchBar() {
  const router = useRouter()
  const [search, setSearch] = useState('')
  const handleSearch = async (e: FormEvent<HTMLFormElement>) => {
    e.preventDefault()
    setSearch('')
    router.push(`/search/?q=${search}`)
  }

  return (
    <form
      className="p-4 rounded-full bg-zinc-100 flex items-center gap-4 border border-zinc-200 focus:border-zinc-400"
      onSubmit={handleSearch}
    >
      <input
        type="text"
        placeholder="Search for reels"
        className=" bg-inherit focus:outline-none w-full"
        onChange={(e) => setSearch(e.target.value)}
      />
      <div className=" border-l h-6 border-zinc-300"></div>
      <button type="submit">
        <MagnifyingGlassIcon
          className=" text-zinc-400"
          width={24}
          height={24}
        />
      </button>
    </form>
  )
}

export default SearchBar
Finally, the search page receives the parameter in the server and renders the post list with the query as a prop
import React from 'react'
import InfinitePosts from 'components/post/InfinitePosts'
import Error from 'components/UI/Error'
type Props = {
  params?: {
    num?: string
  }
  searchParams: {
    q: string
  }
}
async function SearchPage({
  params,
  searchParams,
}: {
  params: { slug: string }
  searchParams?: { [key: string]: string | undefined }
}) {
  let q = searchParams?.q || ''

  return (
    <div className="container">
      {q ? (
        <InfinitePosts searchQuery={q} />
      ) : (
        <Error message={'no posts found..'} />
      )}
    </div>
  )
}

export default SearchPage
Profile Edit
The profile edit form is a simple form that uses pocketbase client to update the profile information .
  const submitForm = async (event: any) => {
    event.preventDefault()
    setLoading(true)
    const formData = new FormData()
    if (file) {
      formData.append('avatar', file)
    }
    if (bio) {
      formData.append('bio', bio)
    }
    if (displayName) {
      formData.append('name', displayName)
    }
    try {
      if (id) {
        await pb.collection('users').update(id, formData)
        setStatus('Updated successfully ✅')
      }
    } catch (e) {
      console.log(e)
      setStatus('Failed tp update 🚫 ')
    }
    setLoading(false)
  }
Deployment
Deploying the backend with railway
The great thing about pocketbase is the easy of deployment, because of its simple file structure and being lightweight, It took is to connect railway to this awesome docker image created by a pocketbase developer. On the build is done, to can navigate to your project's URL and navigate to the admin panel to import your schema.
Deploying the frontend with Vercel
Deploying the app is as simple as railway, create a new project in Vercel and connect it to your GitHub repo.
Note that at this step, it is important to enter your environment variables, your API URL needs to be you railway backend URL followed by /api/
Final thoughts
Preview the full app deployment here : https://instagram-reels-next-js13-pocketbase.vercel.app/
Full app repo is available for free via this link : https://github.com/AchrafGarai/Instagram-Reels-NextJs13-Pocketbase
This project explains the highlights of the app from the GitHub repo below, I recommend you clone and test the app yourself to further understand some small the details that are not covering in this post.